
Disclaimer: This is a very technical post; made only for crazy developers.
This is a description on how to set up an Azure NC24 VM which contains 4 Tesla K80 GPUs. The idea was to setup a NC24 VM and install MXNet with GPU support under Ubuntu 16.04 LTS to add some power to a simple 9-layer Convolutional Neural Network. The official documentation is quite helpful and can be found here.
The key learning is this: Rather re-write your code in Python. After a few days this turned out to be the fastest way for us.
Still for documentation purposes, I publish this article. It might happen that there are other crazy people out there, for whom it can be useful.
I was generally following the process described here: Building Deep Neural Networks in the Cloud with Azure GPU VMs, MXNet and Microsoft R Server.
I. Azure set-up
If you don’t have an account at Azure yet, get one. It’s quite straight forward, with exception of one potential problem, if you are new to Azure.
- Add a Virtual Machine with Ubuntu 16.04.
- This one is tricky: If you have just registered an account, your free account will not allow you to buy a NC24, because the default quota for the virtual cores you can get is too small.
Solution: Transform your free plan into a paid plan (the start credit will remain) and write to support for an increase of the vcore quota in the data center location you would like to spin up your VM.
II. System Setup
As mentioned above, I was following this article.
It assumes all the packages (CUDA, cuDNN, MKL and MXNet) are in the user’s home directory. There is a description in the article above on how to get them. You will need accounts at NVidia and Intel. But it turns out that the versions that are linked in the article are too old and not supported / not easily available anymore. So here comes the full process:
- Prepare the system:
Update apt-get: $ sudo apt-get update
Install everything needed: $ sudo apt-get install -y libatlas-base-dev libopencv-dev libprotoc-dev python-numpy python-scipy make unzip git gcc g++ libcurl4-openssl-dev libssl-dev
Update to alternatives for cc: $ sudo update-alternatives --install /usr/bin/cc cc /usr/bin/gcc 50 - Install CUDA:
Trying to install CUDA from the downloaded package failed for me.
Here is what I tried:
$ chmod 755 cuda_8.0.27_linux.run
$ sudo ./cuda_8.0.27_linux.run –override
During installation select the following options when prompted:
- Install NVIDIA Accelerated Graphics Driver for Linux-x86_64 361.77? — Yes
- Do you want to install the OpenGL libraries? — Yes
- Do you want to run nvidia-xconfig? — not necessary for this example.
- Install the CUDA 8.0 Toolkit? — Yes
- Enter Toolkit Location [default is /usr/local/cuda-8.0] — select default
- Do you want to install a symbolic link at /usr/local/cuda? — Yes
- Install the CUDA 8.0 Samples? — No
If installation of CUDA fails:
$ sudo apt-get upgrade -y
$ sudo apt-get dist-upgrade -y
$ sudo apt-get install linux-image-extra-virtual
$ sudo apt-get install linux-source
$ sudo apt-get source linux-image-$(uname -r)
$ sudo apt-get install linux-headers-$(uname -r)
… still failed. I finally decided to install CUDA 9 via package manager.
Finally it works like this:
$ sudo apt-get install cuda
Btw: Since you install CUDA from the package manager, you will get the latest patches and you don’t have to install them in addition. This also means, that in the following, the versions will be different from what was used int the article.
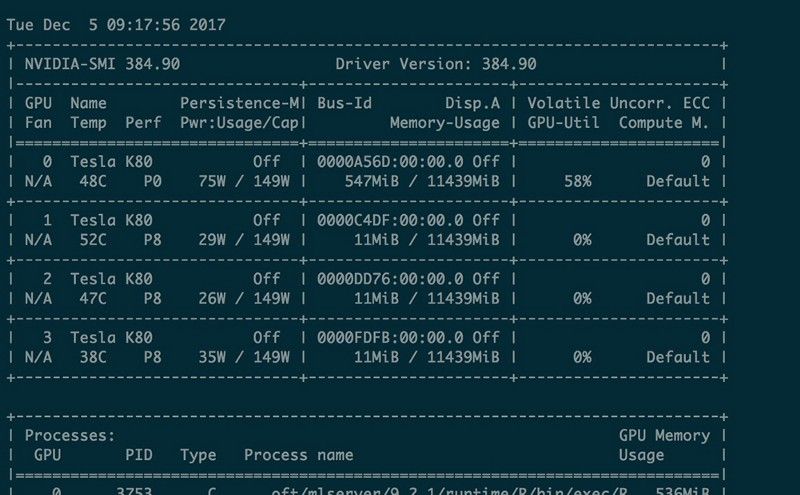
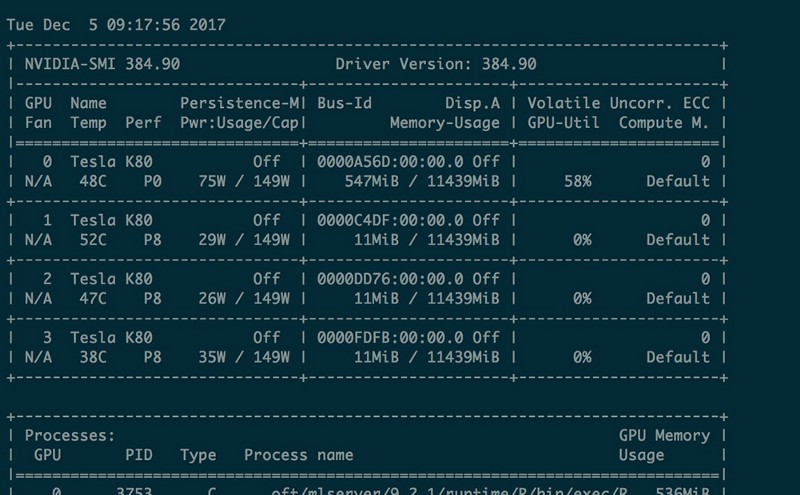
Try out if nvidia-smi works (set persistence-mode)
$ sudo nvidia-smi -pm 1
$ nvidia-smi
This should now show something like this… (see screenshot at the end of this section) - Download and install cuDNN and create a symbolic link for cudnn.h header file:
$ tar -xvzf cudnn-9.0-linux-x64-v7.tgz
$ sudo mv cuda /usr/local/cudnn
$ sudo ln -s /usr/local/cudnn/include/cudnn.h /usr/local/cuda/include/cudnn.h - Download and install MKL:
$ tar -xvzf l_mkl_2017.3.196.tgz
$ sudo ./l_mkl_2017.3.196/install.sh
Follow the prompt and enter the MKL serial number that you received in email from Intel. The default installation location is /opt/Intel — you’ll need this for the next step. - Install MXNet:
I decided to install the latest version before the update to 1.0.
Installing those two packages solved some problems for me:
$ sudo apt-get install -y libopenblas-dev liblapack-dev
$ git clone --recursive https://github.com/apache/incubator-mxnet.git mxnet --branch 0.12.1
Edit the .bashrc and add the links to CUDA and cuDNN libraries.
$ nano ~/.bashrc
$ export LD_LIBRARY_PATH=/usr/local/cuda/lib64/:/usr/local/cudnn/lib64/:$LD_LIBRARY_PATH
$ export LIBRARY_PATH=/usr/local/cudnn/lib64/
And reload the environment: $ bash
Next, copy the config.mk to the $MXNET_HOME directory.
$ cd mxnet/$
$ cp make/config.mk .
Modify the $MXNET_HOME/config.mk make file to use CUDA, cuDNN and MKL.
$ nano config.mk
USE_CUDA = 1
USE_CUDA_PATH = /usr/local/cuda
USE_CUDNN = 1
MKL is to be used, so set USE_BLAS and USE_INTEL_PATH as follows:
USE_BLAS = mkl
USE_INTEL_PATH = /opt/intel/
To enable distributed computing, set:
USE_DIST_KVSTORE = 1
Now it's time to build. To build in parallel, I use the –j option.
$ make -j ${nproc} - Install Microsoft R (MLServer):
The MRS (Microsoft R Server) is not available anymore but Microsoft has a new product to use: Machine Learning Server for Linux. The installation is quite straight forward and is described here.
To add MXNet library into R, first add the following two lines to /etc/ld.so.conf: $ nano /etc/ld.so.conf
/usr/local/cuda/lib64/
/usr/local/cudnn/lib64/
Followed by re-configuring dynamic linker run-time bindings:
$ sudo ldconfig - Create the MXNet R Package:
Congratulations for having made it till here. Now comes the fun part. In the $MXNET_HOME folder, run this:
$ sudo Rscript -e “install.packages(‘devtools’, repo = ‘https://cran.rstudio.com’)”
We now need to install a bunch of R dependencies.
$ cd R-package/
$ sudo Rscript -e “install.packages(c(‘Rcpp’, ‘DiagrammeR’, ‘data.table’, ‘jsonlite’, ‘magrittr’, ‘stringr’, ‘roxygen2’), repos = ‘https://cran.rstudio.com')"
If this worked for you just fine. Amazing!
Continue with Step 8. Otherwise check the Troubleshooting at Step9. - Install the MXNet R Package:
$ cd ..
$ make rpkg
$ sudo R CMD INSTALL mxnet_0.12.tar.gz
Troubleshooting the rpkg build: If something goes wrong, it is most likely to be an issue with the compiler flags in the Makeconf. This comment is a great description of how to solve it: https://github.com/Microsoft/microsoft-r-open/issues/26#issuecomment-313739668
The Makeconf location is either /opt/microsoft/mlserver/9.2.1/runtime/R/etc/Makeconf or /etc/Makeconf - Troubleshooting for R dependencies:
For me most of the R dependencies failed to install. Here are the things I did to make them install.
To fix the DiagrammeR package, this helped:
$ sudo apt-get install libxml2-dev
To fix the other packages, this was essential:
$ sudo Rscript -e “install.packages(‘openssl’)”
$ sudo Rscript -e “install.packages(‘httr’)”
$ sudo Rscript -e “remove.packages(‘curl’)”
$ sudo Rscript -e “install.packages(‘curl’)”
Finally roxygen2 could be installed like this:
$ sudo Rscript -e “devtools::install_version(‘roxygen2’,version=’5.0.1', repo=’https://cran.rstudio.com')" - Now you should have made it and you can require MXNet in R and make use of the GPU. Hopefully it will get easier with the next MXNet release. 🚀 🐧 🎉
III. Test run
Let’s give it a try and build some deep neural network! I used the CIFAR-10 problem and dataset as an example. This is a 10-class classification problem, and the data set has 60,000 color images (6,000 images per class). Microsoft published a simple CIFAR-10 training algorithm which can be executed from R. You should first install the argparse dependency:
$ sudo Rscript -e “install.packages(‘argparse’, repo = ‘https://cran.rstudio.com’)”
Now you can run the following command from the extracted folder:
$ Rscript train_resnet_dynamic_reload.R
You should see output which is similar to the screenshot below:
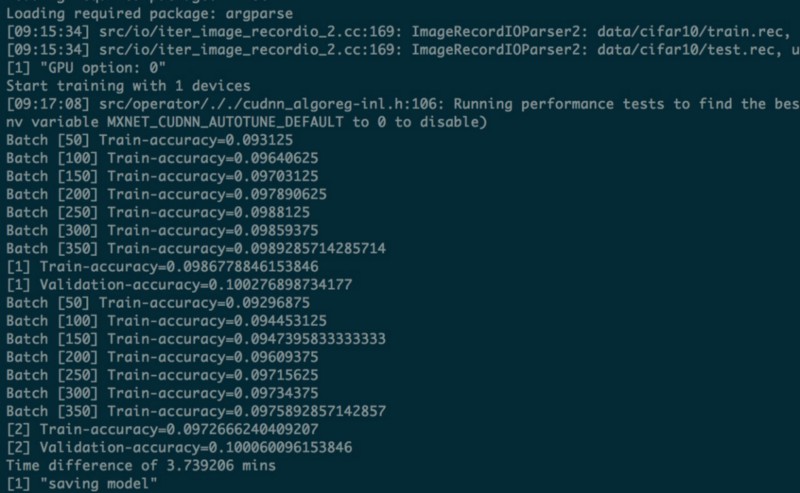
For me it took 3.7 min to run on the GPU. 😎
Quite amazing compared to the CPU: It took Microsoft 119.5 minutes to run in on the CPU.